This post may contain affiliate links. As an Amazon Associate, I earn from qualifying purchases.
Learn how to make a stunning geode birthday cake with rock candy crystals and buttercream — an impressive centerpiece that’s surprisingly achievable for home bakers.
There are a few traditions in our home that mean more to me with every passing year, and making my children’s birthday cakes is one I treasure deeply.
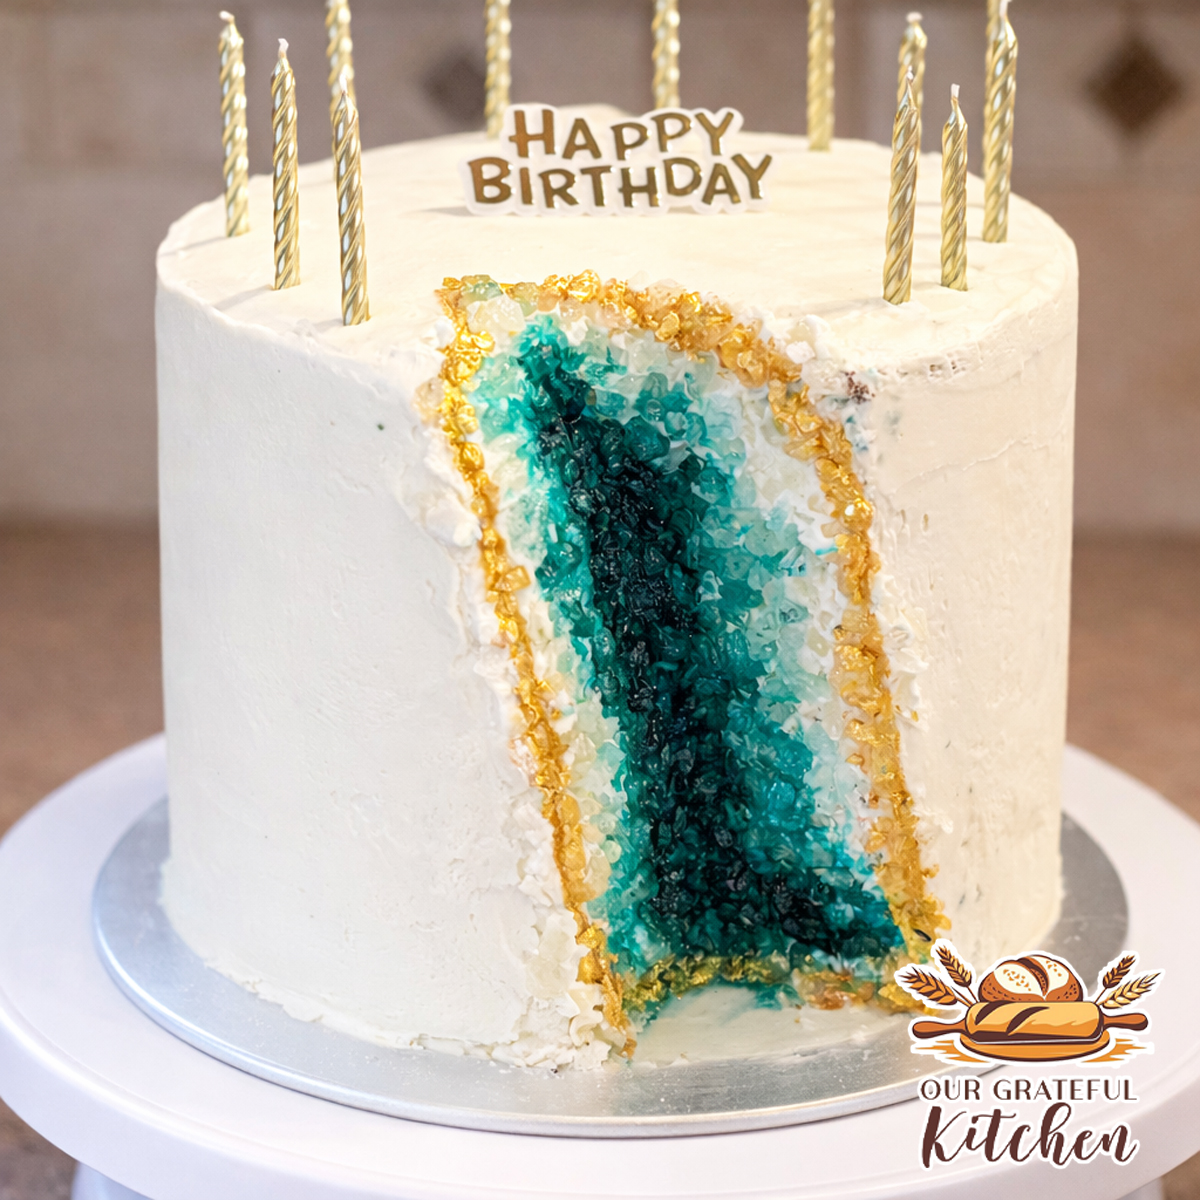
When my oldest daughter turned thirteen, I wanted her cake to feel especially memorable — something elegant, a little unexpected, and fitting for such a milestone birthday. She loves teal, so I designed this geode-style cake with soft metallic details and a crystal-inspired center that made the whole cake feel like a celebration before we even cut into it.
And while it may look like something straight from a bakery window…
I promise — this is far more doable at home than you might think.
If you’re willing to take it step-by-step, you can absolutely create a cake like this for someone you love.
Why You’ll Love Making a Geode Cake
- It creates an unforgettable centerpiece for birthdays
- Surprisingly achievable with the right method
- Perfect for milestone celebrations
- Completely customizable for colors and themes
- Built on sturdy cake layers that stack beautifully
This is the kind of cake that makes people stop mid-conversation just to ask,
“You made that?”
Ingredients
For this cake, you’ll need:
- A sturdy layer cake – for this cake I use 2 batches (makes 4 layers) and turned the scrapings and the extra layer into these geode cake pops
- Buttercream Frosting – I have several recipes posted, choose your favorite!
- Rock candy or edible crystals
- Gel food coloring
- A TINY amount of tequila or vodka, to thin the gel food coloring as you move out from the center
- Edible metallic paint or luster dust
👉 I used my sturdy white cake recipe, along with my homemade vanilla buttercream for a smooth, stable finish.
Equipment Needed
Cake decorating tool kit — If you’re building your baking toolkit, I highly recommend starting with a quality decorating set that includes a turntable, offset spatula, and bench scraper. Having the right tools makes frosting smoother, edges cleaner, and the entire process far less frustrating — especially for layer cakes.
Quality cake pans — I always reach for my Fat Daddio’s 8-inch anodized aluminum cake pans because they bake evenly and release beautifully.
Small food-safe paintbrush — Ideal for applying metallic accents with control.
How to Make a Geode Cake
Creating a geode cake is less about advanced skill and more about patience and layering techniques.

Start with cake layers that are completely cooled before leveling them. Even, flat layers are what give a tall cake its stability.
After stacking with buttercream between each layer, apply a thin crumb coat and allow it to chill. This step locks in loose crumbs and creates a smooth foundation for the final coat.

Once your outer layer of buttercream is applied and smoothed, it’s time for the design.
Carefully carve a small section from the side of the cake to form the geode shape. Don’t rush this — gradual carving gives you far more control than removing too much at once.

Before adding the crystals, spread a thin layer of buttercream inside the carved area. Think of this as glue that will hold everything securely in place.
Press the rock candy into the buttercream, starting with larger pieces and filling gaps with smaller ones until the space looks natural and full.

To enhance the geode effect, deepen the color toward the center using gel food coloring, blending outward for a dimensional look.

Finish by lightly brushing edible metallic paint along the edges. This small detail adds incredible visual impact and gives the cake that signature geode shimmer.
Sometimes it’s the simplest finishing touches that make a cake feel truly special.

For this cake, I baked 4 layers, and used 3 to stack, and one layer and the cut off tops to make these ADORABLE marble cake pops. Both of these desserts along with the dirty soda bar made the party truly unforgettable!
Geode Birthday Cake

This geode birthday cake features sturdy white cake layers stacked with buttercream and filled with shimmering rock candy crystals for a stunning, bakery-style centerpiece that’s achievable for home bakers.
- Prep Time: 2 hours
- Decorating Time: 1 hour
- Cook Time: 30 minutes
- Total Time: 3 hours 30 minutes
- Yield: 1 three or four-layer 8-inch cake (serves approximately 12–16 or 18-24)
- Category: Dessert
- Cuisine: American
Ingredients
Cake Layers
-
2 batches sturdy white cake (4 – 8 inch layers)
Frosting
-
2 batches vanilla buttercream
(Important: celebration cakes ALWAYS need more frosting than you would expect.)
Geode Filling
-
1-2 cup white rock candy (for dimension)
Decoration
- gel food coloring (teal or preferred shade)
- a TINY bit of tequila or vodka
- edible gold luster paint
- 1–2 tsp clear extract or tequila / vodka (for painting: you’ll need this to thin gel food coloring and lighten the color as you move outward from the center – important!)
Instructions
- Bake the cake layers – Prepare the white cake according to the recipe instructions. Allow layers to cool completely before assembling.
- Level the cakes – Use a long serrated knife to remove the domed tops so each layer is flat and stable.
- Stack and crumb coat- (Sometimes called “dirty icing”) Layer the cakes with buttercream between each layer, then apply a thin crumb coat. (see post for more instruction) Chill for 20–30 minutes to set.
- Apply the final coat – Frost the cake with a smooth layer of buttercream using a bench scraper for clean edges.
- Do NOT aim for perfection — slight texture keeps the cake looking approachable and homemade.
- Carve the geode- Using your serrated knife, or a large spoon, carefully carve a vertical section from the cake to create the geode opening. Work slowly — removing small amounts at a time gives you more control than cutting too deeply at once.
- Frost inside the cutout- Spread a layer of buttercream inside the carved area. This acts as the adhesive for the crystals.
- Add the rock candy- Press rock candy pieces into the buttercream, starting with larger chunks and filling gaps with smaller crystals until the space looks natural. Avoid making it overly symmetrical — organic placement looks most realistic.
- Add the color – Add the deepest, least diluted gel food coloring to the interior shade using gel coloring for added dimension.
- Add dimension- Dilute the food coloring down and (2 parts food coloring, 2 parts thinner) and paint outside of the the dark center you’ve created, creating a lighter gradient pattern. Then, thin the gel again by about half and give it an even lighter outside “barely there” coloring.
- Paint the edges- Use your edible gold paint, or mix edible gold dust with a small amount of clear extract or vodka to create a paint. Lightly brush along the outer edges (only) of the geode to define the shape and add shimmer.
- Chill before serving– Refrigerate briefly to firm the buttercream, then allow the cake to sit at room temperature before serving.
Notes
A cake decorating kit with a turntable, bench scraper, and offset spatula makes this process dramatically easier and helps achieve smoother results.
Always start with a sturdy cake recipe designed for stacking.
Chill the cake before carving for cleaner cuts.
Rock candy can be broken into smaller pieces using a rolling pin if needed.
Tips for Success
- Start with a sturdy cake recipe designed for stacking
- Chill the cake before carving for cleaner cuts
- Use a stable buttercream frosting
- Use a bench scraper for a smoother finish
- Build crystal layers gradually for a natural look
- Don’t overthink the design — organic is beautiful
- Use your leftover / discarded cake for Homemade Cake Pops
Storage & Make-Ahead Tips
Store:
Keep the cake covered at room temperature for up to one day, or refrigerate if your kitchen runs warm.
Make Ahead:
Cake layers can be baked in advance and frozen, making assembly much easier the day before your event.
Serve:
Allow the cake to sit at room temperature briefly before serving for the best texture.
Variations & Design Ideas
- Soft pastels for spring birthdays
- Bold gemstone tones for dramatic cakes
- Neutral crystals for weddings or anniversaries
- Match the geode color to party décor

Once you learn the technique, the design possibilities are nearly endless.
Don’t Waste the Cake Scraps!
After carving the geode, you’ll likely have extra cake — and there is no reason to let it go to waste.
I turned mine into beautiful marble cake pops, and they were just as celebrated as the cake itself.
Final Thoughts
Every year that I bake my children’s birthday cakes, I’m reminded that these small traditions become some of the memories they carry with them into adulthood.
This geode cake felt especially meaningful — not just because of how it looked, but because it marked the beginning of my daughter’s teenage years.
And while it may appear elaborate, at its heart it’s simply a homemade cake made with love.
Those are always the ones worth remembering.

See how to make these adorable Marble Cake Pops in my full tutorial!
Leave a Reply